This week I made a lot of progress with the loom, which is good since the show is only 2 weeks away, and dress rehearsal less than 1 week away.
I got it all set up on the ITP floor, got my sensors hooked up, and am spending this next week composing and figuring out my performance.
I was experiencing a drawback with getting the wireless accelerometer data into max/msp, but finally ironed that out a minute ago; the WiTilt 2.5 from SparkFun is a great little device, but there are some pitfalls to watch out for, which caused me many hours of frustration. Here are some tips:
- after you connect to the WiTilt over its serial port, make sure you hit the onboard reset button twice. Only after doing this was I able to get into the config screen from zterm (or terminal) in order to set the device up.
- when you configure the WiTilt, make sure the data is being sent out as 'raw data'. This will send everything out as ascii.
- once you are in max and connected to the WiTilt's serial port, don't forget that you won't be seeing the config screen (unless you are printing the incoming data after sending it through the atoi object), so just trust that after you hit the reset button twice and start getting a string of characters (which should be the config menu converted to dec values), you need to send a '1' character (49) in order to get the data stream started.
- conversely, send a spacebar character (32) to stop the data stream
- the best way to parse out the values you want from the data stream (which will be coming at you in ascii as something like X=392 Y=772 Z=857), is to use regular expressions. I configured my WiTilt to only send me values along the Y-axis, so i was getting a continuous stream of Y=553 (or whatever current reading was). I pulled that data in from the serial port into max, converted the ascii to an integer (atoi), and then used the following regular expression with the max regexp object to get the sensor value: ([\\d+]*)
That regex will take all the numbers out of the incoming serial packet and append them one after another, thus giving you a complete sensor reading (instead of giving you the reading as individual numbers. i.e. 583 coming to you as 5, 8, 3).
The thing that screwed me up the most in the beginning was forgetting to hit the reset button on the WiTilt. I'd sit there insanely frustrated, wondering why the config menu wasn't coming up. Unless I missed it after reading the datasheet a million times (which is still possible I guess), it's not noted by SparkFun that you have to do this. So when in doubt, hit the reset button!
Okay, so the other problem was my stretch sensor wasn't giving me values. That was just a result of a bad connection on the breadboard.
Other things that I have to do is size the yarn. Because it's wool, it's sticking to itself, so to speak. Wool fibers are composed of gazillions of tiny barbs that hook onto each other (which is why felting exists), and to get around this, you need to 'size' your wool, or soak it in water and elmer's glue, basically. One of my upright beams warped and cracked as well, so that was unfortunate.
So for next week, the plan is:
- build a stand for the loom (so it doesn't have to lean up against the wall)
- size my yarn
- compose
- implement xbee circuits so i can transmit sensor values wirelessly (although this will probably not be the version I use in the show, just in case something screwy happens last minute. Wires are much reliable)
Monday, December 03, 2007
Tuesday, November 27, 2007
Loom: Update 6
Okay, I'm still waiting for a space to set my loom up in. And my cat got sick on my laptop, thereby killing it (it's not salvageable apparently) and cutting my access to my max/msp and arduino files thusfar developed. Not a great week.
But I did make some progress, despite that. I re-did my warp, as it wasn't long enough the first time I made it, and it went A LOT faster the second time around (about 2 hours vs, uh, 10 hours last time). So that is now finally complete and attached to my top beam. Other things completed:
- Got the correct bolts in my top beam supports. It's all bolted up to the uprights and ready to go.
_ Got my shed stick cut and bolted to the bottom of the loom (for separating the front and back threads from each other)
- Put together xbee/accelerometer circuits to go on five of the 24 weights hanging from the warp
- Got my shuttle put together with the wireless accelerometer sensor + a lithium battery
- Rewrote my max patch to where it was before
Oh yes, the xbee is an addition, heh. I am combining this final with my Mesh Networking final, and making the weights wireless devices that send their values remotely. I will be keeping a wired version of the code and board handy though, in case some kind of wireless mishap takes place, which seems to always be a danger, and I don't want any of that at showtime.
This next week is just wrapping everything up I guess and well, getting the xbee stuff all working flawlessly as well as tweaking the sound still.
Tuesday, November 20, 2007
Loom: Update 3-5
Okay, a lot has happened since my last update, but much progress was made. Here's what I've finished over the last three weeks:
- The loom is completely built!
- I decided to white wash it... at first i thought about staining it a dark walnut color, but went the other direction entirely and chose to make it all white.
- I finished making the weights which will be used for maintaining tension in the warp threads. They are 11oz soda cans slipped into black + gold woven fabric pouches I had sewn up over the weekend. 2 yards of fabric yielded about 28 pouches that will fit a soda can snuggly, with 3-4" of extra fabric past the length of the soda can for tying to the warp threads. Even though I got about 28 pouches out of my fabric, I'm only using 24 weights.
- Today I finished making the warp (the vertical threads that hang down from the top beam).
This next week will consist of me setting up my loom in its full glory, and testing it out. There are still a few other tasks to take care of though. Specifically:
- Get a large enough drill bit so i can set the top beam's supports in place better with nuts.
- Sew the warp to the top beam.
- Attach the weights.
- Tie the back threads to the heddle (the bar that I'll be pulling to bring the back threads over the front threads)
- Attach the sensors to the heddle and 5 of the weights.
- Attach the wireless accelerometer to my shuttle. I finally got it in the mail today.
- And practice!
The last few weeks had some pretty frustrating moments. Making the warp was insanely difficult to manage alone. Typically it takes a couple people to get it done, but it was hard to find someone who had time to help me out. I did eventually get it done on my own, after working on it for about 10 hours.
Also, I had to switch materials for use in the warp (the vertical, hanging threads). I was using wool for felting before but switched to a chunky alpaca yarn, as the felt wasn't strong enough to hold the weights; it kept tearing.
I have realised that wood that has been pre-treated for staining and then stained, tends to splinter when you try to drill into it. I should have done all my drilling before painting it. Fortunately, this splintering only happened on my uprights while attaching the supports for the top beam, so it won't be too visible.
The project is coming along really well though; I can see the light at the end of the tunnel. From Thanksgiving on out, I should be able to use any time I have for rehearsal and max patch tweaking.
word charts/automatic diary
I've always wanted to have the diligence and lack of self-consciousness that would allow me to keep a diary (or a personal blog, for that matter). I would love to be able to reflect back on my days from last month, a year ago or 15 years ago. However much I've tried since childhood to keep a daily diary, I've never succeeded because I've always felt so self-conscious writing down my thoughts. That feeling plus a little bit of inherent laziness made it so that all of my attempts lasted no longer than 30 minutes for every five years.
I propose to develop a system that keeps a kind of unconscious diary, by capturing everything I type while on my computer (where I spend a large part of my day thinking and communicating), and performing a word analysis at the end of every day. From the analysis, I want to compile a top 10 daily word list, to keep record of the most frequent words used, and then a top 100 daily word list, to hopefully glean what kinds of general feelings or issues I had been dealing with throughout the day. Last.fm inspired me with their running charts, to go a bit further and also keep weekly and overall running word charts, to track how I progressed from certain discussions, events, and perhaps life phases over time.
The data will be written to text files and perhaps uploaded to a blog for keeping public record; this last detail I'm still working out. How much of myself I want to expose to everybody is still up for questioning. Also, whether or not I want to parse out groups of characters, such that would describe passwords and other private and irrelevant data is another consideration on my mind.
Monday, October 29, 2007
Loom: Update 2
This week was all about max/msp. I got myself up to reasonable speed with max and have built a basic circuit that takes in readings from sensors, midi-formats them, and sends them out via midi to max. Once they get to max, i take the values in off channels 0 - 15 and send them through various filters. I was happy to get some noise out of my circuits this week.
Once I was able to get the readings from arduino to max, I focused on manipulating the midi data so as to get the kinds of textures/sounds that I'm looking to sculpt out of the data. I'm still working on that now.
Next week, I plan to continue working on the sound, and also doing the following:
- build the loom with sensors tentatively placed. I will be building a warp-weighted vertical loom.
- build the loom
- BUILD THE LOOM!!!!
- complete my max patches
- get the materials i'm going to actually be weaving with
This week, I didn't have any major hangups. Now that I actually have data coming in and pushing sound out of the patches i'm using, I am feeling good about getting the max/msp stuff done. I expect next week will be full of issues, since I will putting together a kind of prototype for two wednesdays from now.
Tuesday, October 23, 2007
Kick Me: Finished!
We got our xbee/fsr controlled kick game for Mesh Networking working today!
The icons come out on a broadcasted beat, which our xbee picks up, and then are 'kicked' to one of four environments, depending on which force sensor pad the player stomps on.
So okay, we aren't actually 'kicking' anymore; it's now 'Stomp Me'. Or alternately Kick (Stomp) - A - Mole (Icon).
Anyways, here's a screen cap:

And the Processing source code:
SRC
Monday, October 22, 2007
Loom: Update 1
So I've broken the task of building this loom down into a few categories of attack:
Material (yarn)
Loom (building + augmentation of...)
Hardware (sensors, circuits)
Software (music mapping and programming)
Performance
This week I took on a few of the tasks under the Software header. I mapped out how I would use the loom for actual sound production and worked on some test patches in max/msp.
I also decided on what kinds of sounds I am going to produce. I'm going with deep synthy sounds, contrasted with fuzzy, crackly, scratchy sounds. Although it's nothing I'm completely intentionally doing, I'm well aware that many of the sounds I'm going with reference wool, hair, and other organic fibers.
As far as mapping goes, I'm tentatively going with this plan: I'd like the warp (vertical strands) to alter the sounds I've already laid on the canvas (which will be controlled by the weft, or the horizontal strands). The shuttle will either operate as a beat keeper, or it will act as some kind of interrupt as it slides across the warp. Actually, it will become percussive by default, as it affects the warp threads. I'd also like to have panning mapped literally going from left to right across the loom.
This next week, I want to continue working on my patches. The max/msp part feels like the largest challenge so far, since it is the part I'm the least familiar with. I will also try to build out a 'test loom', which will just be warp and weft threads hand-laid out so I can try to mock up what I ultimately want to do with the final loom.
The biggest challenge is working with max/msp. I'm fairly new to this program, and it can seem like a beast, and therefore hard to get started with. I'm overwhelmed by what I can potentially do, and by deciding what I exactly need to do. For now, I'm just accepting midi-data in from a test circuit, and producing sounds with that data.
Tuesday, October 16, 2007
xbee game (as yet unnamed)
My group and I decided to make a little foot-eye coordination game, coordinated to a xbee broadcasted beat. The parts to our project are as such:
- a physical interface consisting of a kick pad with FSRs in them, for recording which pad was kicked and how hard.
- the hardware involving an xbee and arduino, for capturing the broadcast beats and fsr readings
- the software, processing, for displaying our environment, which will be updated per the data sent over from our arduino.
Basically, our processing environment consists of four areas: a forest, a city, a desert, and a river. The screen will be divided into four equal parts for each eco-system. Moving along the bottom of the screen (coordinated to every 2nd broadcast beat) will be a conveyor belt, carrying with it three different kinds of icons: an egg, a baby, or a seed:
These icons will drop onto the conveyor belt in coordination with the broadcasted beat. Depending on which FSR pad you kick, you can send each of these icons out into one of the four environments. How hard you kick the pad will determine how far out 'into' the screen the icon travels. Finally, depending on which icon you kicked and which environment it landed in, the egg/seed/baby will grow into a specific animal/plant/character. For example, if you kick the baby into the city/desert/forest/river, you will get:
So far, we have designed our icons and have the core architecture of the processing program in place. We also have been able to pick up the broadcasted beat and are working on putting together a kick pad.
We have divided up the labor as such:
Shin-yi + Sarah: Graphics/Animation/Processing programming
Daniel + Shilya: Kick pads and hardware programming
- a physical interface consisting of a kick pad with FSRs in them, for recording which pad was kicked and how hard.
- the hardware involving an xbee and arduino, for capturing the broadcast beats and fsr readings
- the software, processing, for displaying our environment, which will be updated per the data sent over from our arduino.
Basically, our processing environment consists of four areas: a forest, a city, a desert, and a river. The screen will be divided into four equal parts for each eco-system. Moving along the bottom of the screen (coordinated to every 2nd broadcast beat) will be a conveyor belt, carrying with it three different kinds of icons: an egg, a baby, or a seed:
 |  |  |
These icons will drop onto the conveyor belt in coordination with the broadcasted beat. Depending on which FSR pad you kick, you can send each of these icons out into one of the four environments. How hard you kick the pad will determine how far out 'into' the screen the icon travels. Finally, depending on which icon you kicked and which environment it landed in, the egg/seed/baby will grow into a specific animal/plant/character. For example, if you kick the baby into the city/desert/forest/river, you will get:
 |  |  |  |
So far, we have designed our icons and have the core architecture of the processing program in place. We also have been able to pick up the broadcasted beat and are working on putting together a kick pad.
We have divided up the labor as such:
Shin-yi + Sarah: Graphics/Animation/Processing programming
Daniel + Shilya: Kick pads and hardware programming
Sunday, October 07, 2007
ROCK/PAPER/SCISSORS
My partner and I each built a device with an arduino and xbee radios that can wirelessly play rock/paper/scissors with the other. We got it 100% working now, but until today, there were two strange bugs causing me (the programmer) a major headache.
ARDUINO SRC
The Problems :(
The first bug was how the win/loss/tie was being tallied; only one of us ever got the results back from our match (had one of our win/loss/tie LEDs switch on), and it was always opposite of what it should have been. For example, if I rolled first, and chose rock, and then she rolled and chose scissors, her 'win' light would turn on (even though she should have lost), and I would have no outcome LED turn on at all.
The second bug (which turned out to be the reason for why one of us wouldn't have an outcome LED light up) was causing the character 'A' to be sent out the serial port, after each round played. Whenever we started a new round, the program would run through the whole switch statement, and then for one us, begin to start a new round up again, without having triggered the program to do so. This also caused one of us to not have an outcome LED turn on, because I programmed the game to turn off all LEDs on the board (to reset the board, essentially) at the start of each new round.
The Answers! :)
The first bug was due to my dyslexic coding. After I make a choice and send it to my opponent, and receive my opponent's choice, i run the data through a function that compares the two choices and switches on the appropriate outcome LED (win/tie/loss). Well, the issue turned out to be that I was comparing the opponent's choice as though it was *mine* and my choice as though it was my *opponent's*. Thus, we were getting the results backwards and the wrong outcomes. Once I fixed this, we were getting the right outcome LEDs to turn on.
The second bug was due to us not having put any delays in our main switch statement. After adding a 1 second delay before setting the game back into 'gameOver' mode (in the last case statement), we finally weren't getting any extra characters sent out the serial port (which was screwing up the whole game flow). Basically, I have a function in the main loop that is constantly checking the status of the play button. If the play button is high (is depressed) *and* the game's current status is 'gameOver', it sets the game's status to 'start', sends an 'A' out the serial port (to start the handshake with the other device), and randomly picks a number corresponding to rock/paper/scissors while waiting for the other guy to start their game too. Essentially, it starts a new round of rock/paper/scissors. Well, what was happening was that the program was playing and processing one round faster than we could finish pushing the button. Which is pretty damn fast. So adding a 1 second delay in there gave our lowly human hands enough time to stop pushing the button before the game was over.
Other than those issues, we only had one other pitfall, which I'm sure plagues 90% of people working with xbees. At least when you first start working with them, and have been up coding for 12 hours straight: We assigned the same id's to each radio. We figured that problem out early on, but it's still worth mentioning. Make sure your radios actually have someone else to talk to. Talking to yourself doesn't get you too far in the world of wireless communication.
Wednesday, October 03, 2007
Weaving Sound
For NIME this year, I've decided to create a loom which triggers samples and other various sounds, via max/msp. The exact details are yet to be worked out, as this is the simply the first step taken out of many. After much rumination on how I could combine both fiber arts and sound however, I'm happy to of finally found a direction which feels 'right'.
Looms, of course, are the tools used in weaving. They range from simple, hand-held devices, to lap-sized instruments, to giant, room-filling machines. Typically, there is a warp (vertical strands) and a weft (horizontal strands), that are brought together, transforming wools (or other raw materials) into fabric.
Historically, weaving is an ancient, cross-cultural, (traditionally) organic craft, typically assigned to women and yielding items of both expressive and utilitarian purpose.
I find something attractive in pairing both a usually soft, natural, feminine process with an assumed masculine, electronic process, comprised of components not normally thought of as 'soft' (i.e., wires, sensors, chips).
Juxtaposition aside, I feel there is a connection between weaving and musical composition. Actually, whether or not it actually ends up 'musical' is secondary. Transducing the motion of weaving into sound waves feels natural, almost literal – weaving together notes, samples, and aural textures into compositions of patterns and discrete designs.
Here are some of the different kinds of looms I'm looking at:
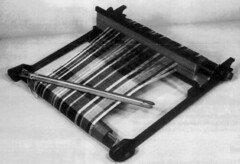
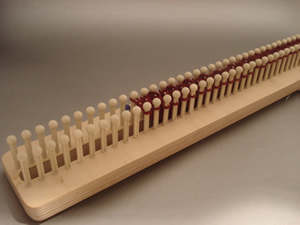
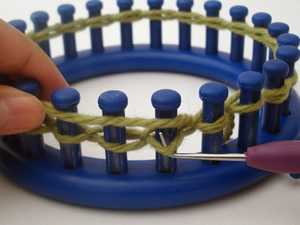
Frame Loom
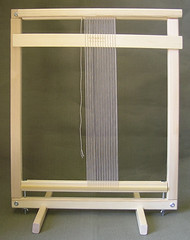
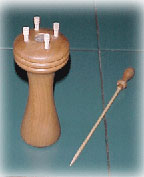
Peg Loom
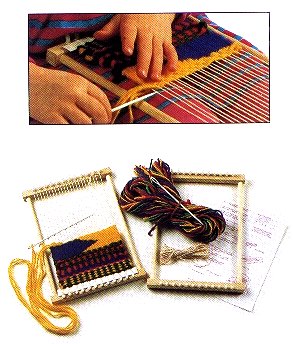
Heddle Loom
Knit Looms
Looms, of course, are the tools used in weaving. They range from simple, hand-held devices, to lap-sized instruments, to giant, room-filling machines. Typically, there is a warp (vertical strands) and a weft (horizontal strands), that are brought together, transforming wools (or other raw materials) into fabric.
Historically, weaving is an ancient, cross-cultural, (traditionally) organic craft, typically assigned to women and yielding items of both expressive and utilitarian purpose.
I find something attractive in pairing both a usually soft, natural, feminine process with an assumed masculine, electronic process, comprised of components not normally thought of as 'soft' (i.e., wires, sensors, chips).
Juxtaposition aside, I feel there is a connection between weaving and musical composition. Actually, whether or not it actually ends up 'musical' is secondary. Transducing the motion of weaving into sound waves feels natural, almost literal – weaving together notes, samples, and aural textures into compositions of patterns and discrete designs.
Here are some of the different kinds of looms I'm looking at:
Frame Loom
Peg Loom
Heddle Loom
Knit Looms
Monday, October 01, 2007
Flow
Happiness and creative flow... While the first does not beget the second, I think it's safe to say that the reverse is definitely true. Being 'in the moment' of intense creativity and therefore productivity is one of the most fulfilling sensations I'm able to feel. It's within these moments that all the dots seem to connect themselves, with little forced effort from my end.
In anycase, I just read a paper detailing the findings of a study of over 800 adolescents and their levels of happiness throughout the day over a one week period. There is an attempt to correlate these moments of happiness to possible moments of activities which might induce such a 'flow'.
The results were not incredibly surprising from the researchers' point of view (the kids were happier hanging out with friends vs studying, happier on a saturday than on monday), except for one point which was taken as counterintuitive: kids from lower socio-economic classes were found to feel better about themselves and feel happier overall, than kids from upper-middle and upper-class segments of society.
Honestly, that doesn't surprise me too much. I feel like higher echelons of society put a lot more pressure on kids to perform to a certain level, while laying restrictions on freedom of choice, specifically pertaining to education, careers and friends. Not only that, but we all know that money is the root of all evil; materialism can be a real drag.
The part of the studying that was most interesting to me was the finding that 'Happiness will increase to the extent that individuals are provided with the means to learn skills that can be deployed to meet reasonable challenges...'. So basically, people like to feel like they are learning, growing, and accomplishing something.
That's why I always go back to school whenever I start to feel a little depressed.
Quick pcomp sketch
So I was asked to make a little device that addresses a problem on the ITP floor. Well, 'problem' is a very subjective term, and it turned out that my 'problem' with the ITP floor wasn't as much of one for anyone else, thereby pointing out that I might be a little OCD. oh well.
The problem I chose to tackle was the one of the pcomp lab's tool box drawers not always being fully shut (photo coming soon). It's not a *huge* problem to me, but an issue nonetheless, however petty it might be. And anyways, it's the one I chose to solve, so here you go:
doorbell
Originally uploaded by 0x000000
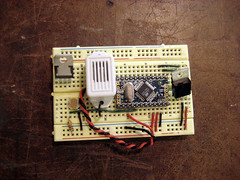
This device is just a photocell + a doorbell buzzer. When the arduino reads a value off the photocell of less than 200 for more than 10 seconds (ideally, this would be set to a couple minutes, so people have time to open the drawer and shuffle about for their item), a very loud, obnoxious, annoying buzz goes off, until the drawer is fully shut again.
arduino src
The problem I chose to tackle was the one of the pcomp lab's tool box drawers not always being fully shut (photo coming soon). It's not a *huge* problem to me, but an issue nonetheless, however petty it might be. And anyways, it's the one I chose to solve, so here you go:
doorbell
Originally uploaded by 0x000000
This device is just a photocell + a doorbell buzzer. When the arduino reads a value off the photocell of less than 200 for more than 10 seconds (ideally, this would be set to a couple minutes, so people have time to open the drawer and shuffle about for their item), a very loud, obnoxious, annoying buzz goes off, until the drawer is fully shut again.
arduino src
Wednesday, September 26, 2007
Artificiel
Artificiel is a group from Montreal I discovered recently (thanks Mouna!) who puts on some pretty awesome shows using objects like rubik's cubes and light bulbs.
I like how the focus is on the performance objects, versus on the humans manipulating the objects. This is how I think I'd be most comfortable performing, as I'm not much of a ham for the stage. Or for anything else, I don't think. Comfort aside, I'd love to be able to pull off such an elegant and engaging performance.
Check out the Cubing performance:
Sunday, September 23, 2007
Wireless LED Glow
I can make an LED glow wirelessly!
xbee_glow
Originally uploaded by 0x000000
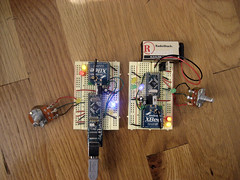
okay, here's what it involves: 2 XBee radios, 2 microcontrollers (I used arduino minis), 2 power sources, 2 variable resistors, and a couple LEDS to control (i'll call these analogue LEDs from here on out). I tried to keep my wires on my board tidy, as wires generate their own radio waves which can create interference with the radio signals your xbees are trying to send out. I didn't do the absolute best job with the tx/rx wires, but it didn't seem to cause any transmission problems, so I let it slide.
Basically, this exercise controls the brightness of an LED on one board (the analogue LED), from another board, via values generated from a potentiometer and sent out wirelessly through an xbee radio. So we go pot 1 --> microcontroller1 --> xbee 1 --> xbee2 --> microcontroller 2 --> analogue LED 2. And this of course, works going the other way as well. Each board can control the brightness of the other's analogue LEDs.
One little pitfall that derailed me for a moment, was having the analogue LED on an analog i/o pin vs adigital i/o PWM pin. While it was tied to an analog i/o pin, i wasn't able to turn it on at all. Make sure the analogue LED is on a digital i/o PWM pin, which you then analogWrite to in order to get it to glow.
xbee_glow
Originally uploaded by 0x000000
okay, here's what it involves: 2 XBee radios, 2 microcontrollers (I used arduino minis), 2 power sources, 2 variable resistors, and a couple LEDS to control (i'll call these analogue LEDs from here on out). I tried to keep my wires on my board tidy, as wires generate their own radio waves which can create interference with the radio signals your xbees are trying to send out. I didn't do the absolute best job with the tx/rx wires, but it didn't seem to cause any transmission problems, so I let it slide.
Basically, this exercise controls the brightness of an LED on one board (the analogue LED), from another board, via values generated from a potentiometer and sent out wirelessly through an xbee radio. So we go pot 1 --> microcontroller1 --> xbee 1 --> xbee2 --> microcontroller 2 --> analogue LED 2. And this of course, works going the other way as well. Each board can control the brightness of the other's analogue LEDs.
One little pitfall that derailed me for a moment, was having the analogue LED on an analog i/o pin vs a
Sunday, September 16, 2007
Inspiration
If I had to pick one track that most closely resembled what I wanted to sound like at the end of NIME, it might be Múm, Sunday Night Just Keeps On Rolling.
I'm interested in layers and texture... and the process of building (them up and down), juxtaposition and weaving. A bit like knitting a soundscape.
I'm interested in layers and texture... and the process of building (them up and down), juxtaposition and weaving. A bit like knitting a soundscape.
Friday, September 14, 2007
People Using Musik
For the last week, I tried to be more aware of how myself and those around me were using music to get through their days. Music has always been a crutch i've willingly leaned on to get me through all kinds of situations. Some of those being (click linked titles to hear mp3s):
Setting up my new apartment. Moving and setting up new digs can be pretty stressful. Listened to: The Shop Assistants
Reading. Listened to: a compilation I made for a friend, consisting of Fleetwood Mac (yeah!), Pet Shop Boys, and the Church, etc.
Daydreaming on the subway. Listened to: New-Wave compilation (Thomas Dolby: Europa)
Afterparty at my house! Listened to: shoegaze
Remembering my trip to Berlin. Listened to: Swayzak
Falling asleep. Listened to: Cocteau Twins
To distract me from A in order to contemplate about B. Listened to: Love and Rockets
Seeking design inspiration: Chris and Cosey
Other people I observed were plugged into music on the subway (listening to ??? Often times, I overhear metal in particular blaring out of someone's headphones. Quite alot), hanging out on their steps in the evening warmth (playing hip hop), and driving down the street (playing LOUD hip hop).
H&M always some kind of techno pounding its walls and its shoppers. I have to say, it really does get me in the mood to buy a ton of clothing.
Restaurants used music too of course, to set moods or assign personalities to themselves. Or to identify with the majority of their clients (Enid's in Greenpoint is always playing Modest Mouse or Pavement, in tune with the indie clientele). Although this is similar to the restaurant assigning itself a personality. It's a which came first kind of question.
Back To School!
It's so great to be back. This semester is going to be the best one yet! I am currently enrolled in: New Interfaces for Musical Expression, Collaborative Mesh Networking, Computers For The Rest of You, and Expressing Information. I'm particularly interested in focussing on NIME and sound design in general this year. So here we go!
Wednesday, April 25, 2007
Joan Dress Update
Hey guys,
I have updated my Joan Dress blog, and have reached the end of phase 1 of the development process. Check it out!
I have updated my Joan Dress blog, and have reached the end of phase 1 of the development process. Check it out!
Monday, April 23, 2007
Actions, Events, and Filtering
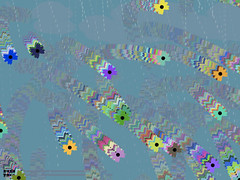
I wrote a program in processing that reacts to how vigorously you shake an accelerometer.
The arduino communicates the sensor's readings through a serial connection to processing. I used a smoothing function, in my arduino code, to get clean values from the accelerometer, which tends to give very eradict readings otherwise.
When you first open up the processing app, it is a calm, blue day.
If you make it so that the sensor's readings match up on the x- and y-axis, you plant flowers on the screen.
Slightly shaking it causes the blooms to blow...
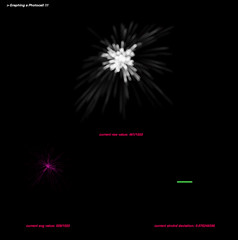
Quickly shaking it causes a rain storm (and all the flowers blow away)
Leaving the sensor alone for 10 seconds let's the storm go away, returning you to a clear day.
Download Processing and Arduino code
The arduino communicates the sensor's readings through a serial connection to processing. I used a smoothing function, in my arduino code, to get clean values from the accelerometer, which tends to give very eradict readings otherwise.
When you first open up the processing app, it is a calm, blue day.

If you make it so that the sensor's readings match up on the x- and y-axis, you plant flowers on the screen.

Slightly shaking it causes the blooms to blow...

Quickly shaking it causes a rain storm (and all the flowers blow away)
Leaving the sensor alone for 10 seconds let's the storm go away, returning you to a clear day.
Download Processing and Arduino code
Monday, April 09, 2007
language objects
The Inkas may have used clusters of strings and knots (called khipu) as their way of recording language, while most other cultures of the world have used written records of ink on paper. This suggestion is described in 1491: New Revelations of the Americas Before Columbus by Charles C. Mann, Appendix B.
Honestly, I have never stopped to think about representing language in terms of objects versus written symbols, but the concept of creating a physical system for recording thoughts is actually quite inspiring. It reminds me of the way genes are encoded in long strands of DNA, although this system sounds like it has many more base elements to it. These elements include the kind of material used, the way the strings were spun, and the direction of the knots attached to all the other strings in the khipu. There were also, apparently, 24 different string colors.
It makes me think that it might be interesting to create a kind of khipu myself. The Inka's khipu sound fairly complex however; each khipu which has been found encoded one of 1,536 possible "distinct information units"!
Our clothes have a fingerprint
I read this fascinating article the other week on how a robber was nabbed based on a unique pattern of wrinkles found down the side of his blue jeans, as seen on the bank's surveillance tape. The puckers and creases along the side-seam of his pants were a result of how his body moved within the denim fabric, thus creating a kind of barcode, or fingerprint, which was used as indisputable evidence in a court of law.
This made me think about all the ways in which we leave our own marks on our habitats. I love thinking about how our environments, including of course, our own bodies, act as a record of our lives. The kinds of activities we engage in, the way we move, these are all silently recorded, day by day. Just looking at my office chair, it's evident that i like to sit on my heels while in it; the fabric is stressed and slightly pushed downwards from the center of the seat.
This also made me think about the notion of 'memory'. It's not an original musing perhaps, but i still find memory fascinating. Life may seem to exist right here right NOW in our field of vision, but the past feels very material nonetheless, thanks to not only records of experiences and thoughts stored in our minds, but also to physical records we may have; gifts, letters, scars, the way the soles of our shoes are worn down in the same place on every pair.
hmm.. fascinating indeed...
American Museum of Natural History
My Sensor Workshop class went by the American Museum of Natural History last week, and got to take a look at their newest permanent exhibit, the Hall of Human Origins. We also got a special behind-the-scenes peek at the workshops where they construct the dioramas on display in the museum.
I was particularly interested in seeing this exhibit, since my old academic roots lie in human evolution and primate sociobiology. Yes, I was a physical anthropology major as an undergrad before switching to design + art, and I still have a strong interest in the going-ons of this field.
Anyways, our task for the day was to think about improvements that could be made to the exhibit, as far as interaction design go. In other words, how could we make the exhibit more engaging, inviting, and clearer to understand for the visitors, all of whom come from many age groups, cultural backgrounds, and levels of education.
There was one display in particular which I thought was on the right track, but just didn't quite make it to the finish line, in terms of being easy to use and understand. It was a large back-lit illustrated map of the world, mounted against one wall, with a second display set in front of it, divided into segments corresponding to different regions of the world. Each of these segments had a description of the region it represented, complete with a touch sensitive, die-cut button that activated the faint tracing of a line on the mounted map, representing immigration into those regions. Each region's line had its own color to help it stand out from the others. This, however, was not enough to get everything across clearly.
The immediate problems with this display were the following:
- After touching a region's button (operative word is 'touching', not 'pushing'... something like a qprox touch sensor was used here), a colored line of very diffuse light would begin to slowly lurch its way from one point on the map to another. The light was in fact so diffuse, it was nearly impossible to spot for all but one region.
- The line tracing took place very slowly, with a significant delay after touching a region's button. It felt as though it was broken at times, like nothing was going to ever happen.
- The button itself was problematic. There was really no good reason to have a touch button in place of a traditional push button. There is something very satisfying and final about actually getting to push a button down, and hear it click back up. It affirms for you that an action has taken place, and will (hopefully) result in some kind of action. When I tried to push the buttons installed for this display, it felt incomplete, and very unsatisfying to have this huge cut-out shape unable to be pushed down.
So right away, it'd be great if at least the lines were much brighter and clearer, and if the buttons had a little more tactile feedback for the user. Also, obviously, the time between activating the button and actually seeing something happen on the map, should be shortened.
Thursday, April 05, 2007
Wearables + Networked Objects final
I'm documenting my project for wearables + netobjs here:
Joan Dress
It's code named Joan for now, for Joan of Arc, who had divine visions from above (i.e., the 'net, naturally!)
Basically, it's a dress augmented with conductive threads and thermochromic inks. The threads cause the inks to change color via resistance heating, and in response to network activity.
Saturday, March 03, 2007
it glows!
I experimented with embedding LEDs into platinum-based silicone. This particular kind of silicone is called Dragon Skin Q (the Q stands for 'quick'; i think so anyways... this kind of silicone sets faster than the regular Dragon Skin).
I'm envisioning having many iterations of this hanging around the neck, or maybe attached to the wrists, or a dress. I love the texture of silicone, and having many small chunks laying over each other and bouncing around is something that would be satisfying to look at, as well as to touch. I'm always interested in finding new ways of creating texture, and the silicone-LED combos are fulfilling this endeavor nicely right now.

I'm envisioning having many iterations of this hanging around the neck, or maybe attached to the wrists, or a dress. I love the texture of silicone, and having many small chunks laying over each other and bouncing around is something that would be satisfying to look at, as well as to touch. I'm always interested in finding new ways of creating texture, and the silicone-LED combos are fulfilling this endeavor nicely right now.
Wednesday, February 14, 2007
Datasheet Report: 8-Bit Shift Register

img pulled off of sparkfun electronics
Today I'm looking at the datasheet of a Texas Instruments SN74HC595 8-bit shift register with 3-state output registers.
Download Datasheet
Features
* 8-Bit Serial-In, Parallel-Out Shift
* Voltage operating range of 2V - 6V
* Low power consumption (80µA)
* Low input current of 1 µA max.
* High-Current 3-State outputs which can drive up to 15 LSTTL loads
(btw, LSTTL stands for "Low-power Schottky" Transistor to Transistor Logic, TTL being a kind of solid state logic)
* Shift register has direct clear
The below diagram shows the pin mappings for this chip, depending on which package you are using:

What does it do?
So, what does an 8-bit shift register do? It's commonly used to increase the output capacity of a microcontroller. Data is shifted down along 8 pins (or more, depending on what kind of shift register you get), and passed out through each pin, expanding the number of possible output pins available to your microcontroller. This is also called 'multiplexing' a signal.
How to Connect
At a minimum, three pins of your microcontroller are required to connect to the 8-bit shift register: one for the clear pin (SRCLR), one for the clock pin (which controls the frequency at which signals are transmitted) (RCLK and SRCLK: these can be connected together or independently), and one for the data you are looking to send through the register, i.e., the input pin (OE).
The clear pin, when set to low, clears all the pins on the shift register of their current state (high/low), and when set to high, allows the pins to receive input from your microcontroller. Because this shift register has a D-type storage register built into it, this means that once you set the pins high or low, they retain that state. Therefore, the clear pin is necessary in order to literally 'clear' the current states of the shift register pins.
In order to get the input signals into the shift register, you must PWM (pulse width modulate) a clock signal for 8 cycles, or however many bits your shift register is designed to carry. Most shift registers use 'synchronus' communication, meaning that the rate at which signals are sent to the IC, rely on the clock signal of the microcontroller, which is transmitted via the RCLK and SRCLK pins.

The shift and storage registers each have their own clocks. When connected together, the shift register is always one clock pulse ahead of the storage register. I'm guessing this is so to keep the data moving ahead in order to make room for the next signal coming down the pipe.
Saturday, February 10, 2007
Sensors and Time
I built a little visualisation tool, using processing, for graphing sensor activity. In this case, I was specifically looking at a photocell. The nature of the data being sensed, in this case, light, informed the way I chose to display the data.
There are three parameters being graphed here: raw data, averaged readings, and the standard deviation between readings.
The circuit is really simple. It's just a photocell hooked up to an arduino board analog in pin. My arduino board communicates serially to my processing app, which then displays the data accordingly.
Download my code here: arduino | processing
Subscribe to:
Posts (Atom)